Vue.jsで、websocketのクライアントサイドのサンプルを作成しました。
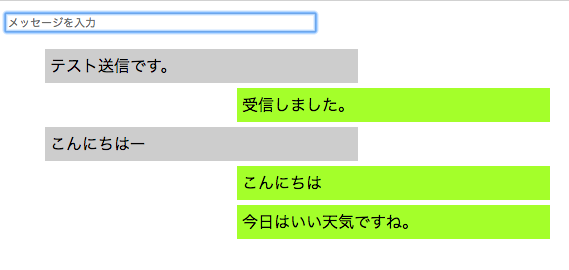
こんな感じでちゃっとができます。 分かりやすさを重点において、できるだけシンプルに作ったつもりです。 私もそこまで詳しい訳ではありませんが、WebSocketやVue.jsの初心者の方々向けの内容になります。
本記事で、どう実装してば良いか掴んでいただければ幸いです。
ちなみに、websocketのサーバサイドはたまたまphpでも実装できないか調べていたこともあり、 こちらの記事を参考にさせていただいて、phpで実装しました。 PHPでWebSocketを利用したリアルタイムチャット
WebSocketについて
WebSocketについてはこちらなどで詳しく書いておりますので、 本記事では説明を省略させていただきます。 WebSocketについて調べてみた。
ディレクトリ構成
.
├── bin
│   └── server.php
├── composer.json
├── index.html
└── src
     └── MyApp
         └── Chat.php
サーバサイドとフロントエンドが一緒になってます。 フロントエンドはindex.htmlのみで、あとはサーバサイドに必要なファイルになります。
サーバサイドのインストール・実行
先ほど紹介させていただいた記事を丸々コピーして実行するだけです。 まずは以下のファイルを作成してください。
ファイルを作成
composer.json
{
    "name": "vue.js/websocket",
    "autoload": {
        "psr-0": {
            "MyApp": "src"
        }
    },
    "require": {
        "cboden/ratchet": "^0.4.0"
    }
}
bin/server.php
<?php
use Ratchet\Server\IoServer;
use MyApp\Chat;
use Ratchet\Http\HttpServer;
use Ratchet\WebSocket\WsServer;

require dirname ( __DIR__ ) . '/vendor/autoload.php';

$server = IoServer::factory ( new HttpServer( new WsServer( new Chat () ) ), 8080 );
$server->run ();
src/MyApp/Chat.php
<?php

namespace MyApp;

use Ratchet\MessageComponentInterface;
use Ratchet\ConnectionInterface;

class Chat implements MessageComponentInterface {
    protected $clients;

    public function __construct() {
        $this->clients = new \SplObjectStorage ();
    }

    public function onOpen(ConnectionInterface $conn) {
        // Store the new connection to send messages to later
        $this->clients->attach ( $conn );
        echo "New connection! ({$conn->resourceId})\n";
    }

    public function onMessage(ConnectionInterface $from, $msg) {
        $numRecv = count ( $this->clients ) - 1;
        echo sprintf ( 'Connection %d sending message "%s" to %d other connection%s' . "\n", $from->resourceId, $msg, $numRecv, $numRecv == 1 ? '' : 's' );

        foreach ( $this->clients as $client ) {
            if ($from !== $client) {
                // The sender is not the receiver, send to each client connected
                $client->send ( $msg );
            }
        }
    }
    public function onClose(ConnectionInterface $conn) {
        // The connection is closed, remove it, as we can no longer send it messages
        $this->clients->detach ( $conn );

        echo "Connection {$conn->resourceId} has disconnected\n";
    }
    public function onError(ConnectionInterface $conn, \Exception $e) {
        echo "An error has occurred: {$e->getMessage()}\n";

        $conn->close ();
    }
}
インストール
作成しましたら、composerコマンドでインストールを行います。 composerコマンドのインストール方法はこちらを参照してやってみてください。 Composerをインストールしてみた
$ composer installサーバ起動
$ php bin/server.phpこれでWebSocketのサーバが立ち上がりました。
フロントエンドの実装
続いてフロントエンドです。 まずはindex.htmlを作成してください。
index.htmlを作成
<!DOCTYPE html>
<html lang="ja">
<head>
<meta charset="utf-8">
<title>vue.js + websocket sample</title>
<style>
.component {
  width: 50%;
}
.box{
  padding: 5px;
  margin-bottom: 5px;
  list-style-type: none;
  word-wrap: break-word;
}
.left {
  background-color: #D3D3D3;
  width: 60%;
  float:left;
}
.right {
  background-color: #ADFF2F;
  width: 60%;
  float:right;
}
p {
  margin: 0px;
}
</style>
<script src="https://cdn.jsdelivr.net/npm/vue@2.5.13/dist/vue.js"></script>
<script>
function main() {
  console.log("# main()");

  // websocketをインスタンス化
  var websocket = new WebSocket('ws://localhost:8080');

  var vm = new Vue({
    el: '#app',
    data: function() {
      return {
        message : "",   // 入力したメッセージを格納する
        messages : []   // 送受信したメッセージを格納する
      }
    },
    methods: {
      /**
       * テキストフィールドでエンターキーが押された時に発生
       */
      keypress : function() {
        console.log("## keypress()");

        // 未入力だった場合は終了
        if (this.message == "") {
          return;
        }

        // メッセージを送信
        websocket.send(this.message);

        // 送信したメッセージを自分の投稿として表示
        this.pushMessage(this.message, "self");

        // メッセージの初期化
        this.message = "";
      },

      /**
       * メッセージを表示する
       * @param {String} message - 表示するメッセージ
       * @param {String} owner - 発言者
       */
      pushMessage : function(message, owner) {
        console.log("## pushMessage()");
        console.log(`message = ${message}, owner = ${owner}`);

        // メッセージを追加
        this.messages.push({
          "message": message,
          "owner" : owner
        });
      }
    },
    mounted: function() {
      var self = this;
      console.log("## mounted()");

      // websocketをオープンした時
      websocket.onopen = function(event) {
        console.log("### websocket.onopen()");
      };

      // websocketでメッセージを受信した時
      websocket.onmessage = function(event) {
        console.log("### websocket.onmessage()");

        // 戻り値チェック
        if (event && event.data) {
          // 受信したメッセージを表示する
          self.pushMessage(event.data, 'opposite');
        }
      };

      // websocketでエラーが発生した時
      websocket.onerror = function(event) {
        console.log("### websocket.onerror()");
        console.log(event);
      };

      // websocketをクローズした時
      websocket.onclose = function(event) {
        console.log("### websocket.onclose()");
        console.log(event);
      };
    }
  });
};

window.onload = function() {
  // HTMLの読み込み完了後に実行
  main();
};
</script>
</head>
<body>
  <div id="app">
    <section id="chat-component" class="component">
      <input type="text" id="message" size="50" v-model="message" placeholder="メッセージを入力" @keyup.enter="keypress"/>
      <div id="chat">
        <ul>
          <li class="box" v-bind:class="item.owner == 'self' ? 'left' : 'right'"
              v-for="(item, index) in messages" v-bind:item="item">
            <p>{{ item.message }}</p>
          </li>
        </ul>
      </div>
    </section>
  </div>
</body>
</html>
index.htmlを開く
作成できましたら、以下のコマンドでindex.htmlをブラウザで開きます。 二回叩いたり、別タブで開くなどして二つウィンドウを開いてください。
$ open index.html「メッセージを入力」のところにテキストを入力してエンターキーを押すと、 チャットの送受信ができるはずです。
参考
以下のサイトを参考にさせていただきました。 ありがとうございました。